A laser printer paper jam can often be resolved quickly by following a systematic approach: first, power down and unplug the printer for safety, then open all access panels to locate the jammed paper, gently remove it in the direction of the paper path, check for any remaining fragments, and finally, close the printer and test it. Most jams stem from incorrect paper loading, using the wrong paper type, or worn feed rollers.
Understanding Laser Printer Paper Jams: Why They Happen
A paper jam occurs when a sheet of paper fails to feed correctly through the printer’s internal pathway, becoming stuck or crumpled. This can happen at any point from the input tray to the output tray. While seemingly random, most paper jams in laser printers have a root cause that, once identified, can help you prevent future occurrences.
Common culprits behind these jams often include incorrect paper loading, which can lead to misfeeds or skewing. Using the wrong type, weight, or quality of paper for your specific printer model is another frequent cause. Paper that is too thin, too thick, or excessively curled can struggle to navigate the intricate paper path. Worn or dirty feed rollers, responsible for grabbing and moving paper, can lose their grip, causing sheets to stop mid-journey. Lastly, dust, debris, or even small fragments of previously jammed paper left inside the printer can obstruct the path and trigger new jams.
Your Step-by-Step Guide to Clearing a Paper Jam
When a paper jam strikes, a calm and methodical approach is your best ally. Rushing the process can lead to torn paper, damaged printer components, or even personal injury. Follow these steps to safely and effectively clear the obstruction and get your laser printer back in action.
Safety First: Power Down and Unplug
Before you even think about reaching into your printer, always turn it off and unplug it from the wall outlet. This crucial first step prevents accidental power surges, protects you from moving parts, and helps avoid electric shock. Laser printers, especially the fuser assembly, can get very hot, so giving it a few minutes to cool down before proceeding is also a good idea.
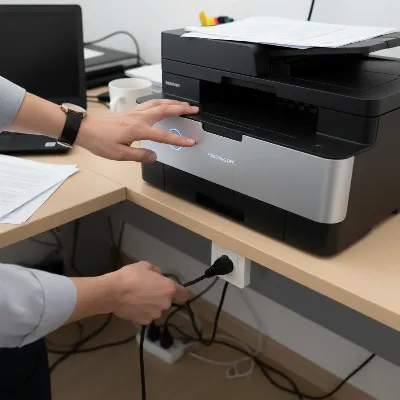 A hand turning off and unplugging a laser printer to fix a paper jam.
Locate the Jam: Open All Access Points
Modern laser printers typically have multiple access panels designed to help you reach different sections of the paper path. Start by opening the main front cover, then check the back, top, and any side panels. Many printers also have a specific access point for the duplexer, a unit for two-sided printing, which is a common site for jams. Systematically open each panel, looking for any visible signs of crumpled or stuck paper.
Gently Remove the Jammed Paper
|
Our Picks for the Best Laser Printer in 2026
As an Amazon Associate I earn from qualifying purchases.
|
||
| Num | Product | Action |
|---|---|---|
| 1 | HP LaserJet MFP M235sdw All-in-One Laser Wireless Printer, Scan/Copy, Black & White, Duplex, Best-for-Office |

|
| 2 | Brother HL-L2460DW Wireless Compact Monochrome Laser Printer with Duplex, Mobile Printing, Black & White Output | Includes Refresh Subscription Trial(1), Works with Alexa |
|
| 3 | Brother MFC-L2820DW Wireless Compact Monochrome All-in-One Laser Printer with Copy, Scan and Fax, Duplex, Black & White | Includes Refresh Subscription Trial(1), Works with Alexa |
|
| 4 | Brother DCP-L2640DW Wireless Compact Monochrome Multi-Function Laser Printer with Copy and Scan, Duplex, Mobile, Black & White | Includes Refresh Subscription Trial(1), Works with Alexa |
|
| 5 | Brother DCP-L2640DW Wireless Compact Monochrome Multi-Function Laser Printer with Copy and Scan, Duplex, Black & White Output | Includes Refresh Subscription Trial(1), (Renewed Premium) |
|
| 6 | Brother HLL3280CDW Wireless Compact Color Laser Printer, Duplex, Mobile Printing & Ethernet | Includes 2 Month Refresh Subscription Trial¹, Amazon Dash Replenishment Ready (Renewed Premium) |
|
| 7 | Brother HLL6210DW Business Monochrome Laser Printer with Large Paper Capacity, Wireless and Gigabit Ethernet Networking, Advanced Security Features and Mobile Printing (Renewed Premium) |
|
| 8 | Canon imageCLASS MF284dw Wireless Black & White Laser Printer – All-in-One for Home Use, Print/Copy/Scan, 2-Sided Printing, 35 PPM, Auto Doc Feeder, Mobile Device Compatible, Starter Toner Included |
|
| 9 | HP Laserjet MFP M234dw Wireless Printer, Print, scan, Copy, Fast speeds, Easy Setup, Mobile Printing, Best-for-Small Teams, Instant Ink Eligible |
|
| 10 | Brother HL-L2405W Wireless Compact Monochrome Laser Printer with Mobile Printing, Black & White Output | Includes Refresh Subscription Trial(1), Works with Alexa |
|
Once you’ve located the paper, use both hands if possible to gently pull the paper in the direction of the normal paper path. Avoid yanking or pulling against the natural flow, as this can tear the paper and leave small, hard-to-find fragments inside. If the paper is tightly wedged, try to slowly rock it back and forth to loosen it. The goal is to remove the entire sheet intact. Be particularly careful around delicate components like the toner cartridge and imaging drum.
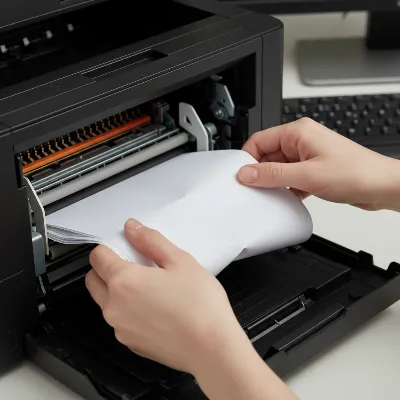 Hands gently removing a piece of jammed paper from the internal mechanism of a laser printer.
Check for Obstructions and Close Up
After removing the visible jam, meticulously inspect the area for any small tears or fragments of paper. Even a tiny piece can cause another jam. Use a flashlight if needed to get a clear view. Also, check for any foreign objects that might have fallen into the printer. Once you are certain the path is clear, carefully close all access panels. Ensure they click securely into place, as printers often won’t operate if a cover is ajar.
Test Your Printer
Plug the power cord back in and turn on your laser printer. Most printers will automatically try to clear any remaining error codes and may even print a test page. If not, try printing a small document or a printer’s internal test page from the control panel. If the print job goes through successfully, congratulations, you’ve fixed the jam! If the jam persists or a new error code appears, you might need to repeat the process or investigate further.
Common Hotspots for Paper Jams in Laser Printers
Understanding where paper commonly gets stuck can speed up your troubleshooting process. Laser printers have several key areas where paper passes through, each prone to jams for different reasons. Knowing these hotspots can help you quickly pinpoint the problem.
The Paper Tray and Feed Rollers
The journey of a sheet of paper begins in the input tray. Jams here often occur if the paper is loaded incorrectly, such as being misaligned, overfilled, or if the paper guides are not snug against the stack. The feed rollers, which pull the paper from the tray into the printer, are also common culprits. If these rollers are worn, dirty, or have lost their grip, they may fail to pick up paper or feed it unevenly, leading to jams right at the start of the paper path.
The Fuser Assembly (Caution: Hot!)
The fuser assembly is a critical component in a laser printer, responsible for melting the toner powder onto the paper using heat and pressure. This area is extremely hot during operation, so exercise extreme caution or allow ample cooling time before inspecting it. Jams in the fuser are often caused by paper that is too thick or too thin to properly fuse, or by worn fuser rollers that aren’t guiding the paper smoothly. Paper might get wrinkled, torn, or simply stuck within this high-temperature section.
The Output Tray and Duplexer
As paper exits the printer, it passes through the output tray. If the tray is full, or if there’s an obstruction, paper can jam here. For printers equipped with duplex (two-sided) printing capabilities, the duplexer is another frequent jam zone. This mechanism reverses the paper to print on the second side, and any misfeed in this complex path can cause a jam. Always check the dedicated duplexer access panel if your printer has one.
Keeping Jams at Bay: Prevention Tips
Preventing paper jams is often simpler and less time-consuming than fixing them. By adopting a few good habits and performing routine maintenance, you can significantly reduce the frequency of these frustrating printer interruptions. Proactive care ensures your laser printer runs smoothly and efficiently for years to come.
Use the Right Paper, Loaded Correctly
Always use paper that is recommended by your printer manufacturer for type, weight, and size. Avoid using wrinkled, bent, or damaged sheets. When loading paper into the tray, make sure the stack is neatly aligned, fanned to separate individual sheets, and that the paper guides are adjusted snugly against the edges of the paper, but not so tight that they crimp it. Never overfill the paper tray beyond its maximum capacity.
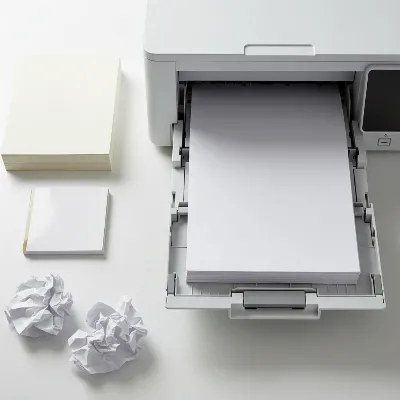 Various paper types and a correctly loaded paper tray in a laser printer to prevent jams.
Regular Cleaning and Maintenance
Dust, paper fibers, and toner residue can accumulate inside your printer, leading to performance issues and jams. Periodically clean the inside of your printer with a lint-free cloth, paying attention to rollers and paper paths. Many laser printers also have maintenance kits available that include new feed rollers and other components. Consult your printer’s manual for specific cleaning instructions and recommended maintenance schedules.
Mind the Environment
The environment in which your printer operates can impact paper quality. Store paper in a cool, dry place away from direct sunlight and humidity. High humidity can cause paper to swell and stick together, while very dry conditions can lead to static electricity, both of which increase the likelihood of jams. Ensure your printer is on a stable, level surface to prevent uneven paper feeding.
Replace Worn Parts
Over time, components like feed rollers naturally wear down and become less effective at gripping paper. If you notice frequent jams despite following all other prevention tips, it might be time to replace these parts. Many manufacturers offer maintenance kits that include replacement rollers. If you’re unsure how to do this, consider consulting your printer’s manual or a professional.
When to Call a Professional for Your Laser Printer
While many paper jams can be resolved with a bit of patience and a methodical approach, there are times when it’s best to call in the experts. Attempting complex repairs without the necessary knowledge or tools can cause further damage to your valuable laser printer.
If you encounter persistent jams that you cannot clear, even after following all troubleshooting steps, it might indicate a deeper mechanical or electronic issue. Similarly, if you find visible damage to internal components, such as a torn fuser film or broken rollers, professional repair is recommended. If your printer displays error messages after you believe you’ve cleared a jam, or if the source of the jam remains unidentifiable, a technician can diagnose the problem more accurately. A professional can quickly identify worn parts, calibrate components, or address complex issues, saving you time and potential further headaches.
Conclusion
Confronting a paper jam in your laser printer can be a minor annoyance or a significant disruption, but with the right approach, it’s a problem you can usually solve yourself. Remember to prioritize safety by powering down and unplugging your device, then systematically locate and gently remove any jammed paper, always checking for lingering fragments. Beyond fixing the immediate issue, adopting preventative measures like using correct paper and performing regular maintenance can drastically reduce the frequency of future jams. While most jams are DIY-friendly, don’t hesitate to seek professional help for persistent problems or visible damage. By understanding your laser printer better, you can ensure a smoother, more reliable printing experience. What steps do you find most effective in preventing paper jams in your own laser printer?
Frequently Asked Questions
Why does my laser printer keep jamming frequently?
Frequent laser printer jams are often due to using incorrect paper types or weights, improperly loaded paper, worn-out feed rollers, or an accumulation of dust and paper debris inside the machine. High humidity can also affect paper quality, making it more prone to jamming.
Can I use any type of paper in my laser printer?
No, it's crucial to use paper types and weights recommended by your laser printer's manufacturer. Using paper that is too thin, too thick, glossy, or with specific coatings not designed for laser printing can damage the fuser unit and lead to frequent jams and poor print quality.
How do I clean my laser printer to prevent paper jams?
To prevent jams, regularly clean the interior of your laser printer, especially the paper path and feed rollers, using a lint-free cloth. You can also use a specialized printer cleaning sheet if recommended by the manufacturer. Always power off and unplug the printer before cleaning.
Is it dangerous to remove a paper jam from a laser printer?
Removing a paper jam can be dangerous if not done carefully. The fuser unit in a laser printer operates at high temperatures (over 350u00b0F) and can cause burns if touched while hot. Always turn off and unplug the printer and allow it to cool down for several minutes before attempting to clear any jams.
What should I do if a small piece of paper is stuck inside after clearing a jam?
Small pieces of torn paper left inside the printer are a common cause of recurring jams. Use a flashlight to thoroughly inspect all accessible areas of the paper path after clearing a jam. If you can't reach it, a soft pair of tweezers might help, but avoid forcing anything that could damage components.
How often should I perform maintenance on my laser printer?
The frequency of printer maintenance depends on your usage. For light use, cleaning every few months might suffice. For heavy office use, monthly or quarterly cleaning and inspection are advisable. Consult your printer's manual for specific maintenance schedules and recommendations, as some manufacturers suggest annual professional servicing.
Clear a Laser Printer Paper Jam
Follow these steps to safely and effectively clear a paper jam from your laser printer and get it back to printing.
Always turn off and unplug your laser printer from the wall outlet before attempting any repairs. This prevents electric shock and protects you from hot components like the fuser assembly, which can reach high temperatures. Allow a few minutes for the printer to cool down.
Open all access panels on your printer, including the front, back, top, and any side covers, as well as the duplexer if present. Systematically check each section for visible signs of crumpled or stuck paper. Use a flashlight for better visibility in dark areas.
Once located, use both hands to gently pull the jammed paper in the direction of the normal paper path. Avoid yanking or pulling against the natural flow to prevent tearing the paper and leaving small fragments inside. If the paper is tightly wedged, try slowly rocking it back and forth to loosen it.
After removing the main jam, meticulously inspect the area for any small tears or fragments of paper, as even tiny pieces can cause future jams. Use a flashlight to ensure the path is completely clear. Carefully close all access panels, ensuring they click securely into place, as printers often won't operate if a cover is ajar.
Plug the power cord back in and turn on your laser printer. Most printers will automatically try to clear any remaining error codes. Print a small document or an internal test page from the control panel to confirm the jam is resolved and the printer is functioning correctly. If the issue persists, repeat the steps or consider professional help.
Get our weekly buyer guide
Practical specs, not advice. Unsubscribe anytime.
This was exactly what I needed! My laser printer at work jammed right before a big presentation, and I was panicking. The step-by-step guide, especially the part about powering down and unplugging for safety, made me feel confident tackling it. I got the paper out, and the printer worked perfectly. Saved my day!
I was constantly battling paper jams with my old office printer, and it was driving me crazy. Following the advice here about checking for remaining fragments after removing the main jam was a game-changer. I always thought I got it all, but those tiny pieces were the real culprits. My printer’s been running smoothly ever since!
Great advice on understanding why jams happen! I never really considered that incorrect paper loading could be such a big factor. I used to just shove the stack in, but now I’m much more careful to align it properly in the input tray. It’s definitely reduced the frequency of jams on my home laser printer.
The tips for gently removing the paper in the direction of the paper path were helpful, and it did clear my jam. However, I still feel like my printer jams more often than it should. I’ve tried different paper types, but maybe my feed rollers are just worn out like it mentioned. It’s a decent guide, but didn’t completely solve my recurring issue.