Opening a fresh document only to find smeared text, dirty streaks, or smudged margins can be incredibly frustrating, especially when print quality is crucial. Laser printer smudging is a common nuisance for both home and office users, often hinting at underlying issues that disrupt the delicate printing process. Fortunately, most of these problems have straightforward causes and readily available solutions, meaning you can often restore crisp, clean prints without needing a professional technician right away. Let’s explore the world of laser printer smudging, uncover its causes, and discover how to banish those messy prints for good.
 Example of a smudged laser print showing blurred text and streaks
Understanding Laser Printer Smudges: What’s Happening?
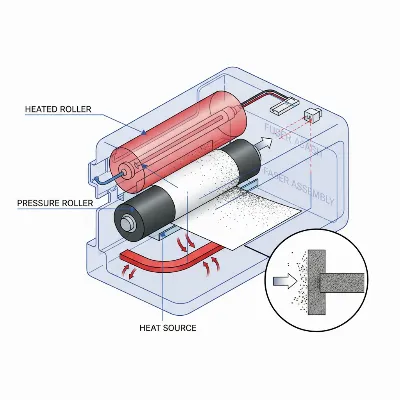
At its core, laser printer smudging occurs when the toner, the dry powder used to create images and text, fails to properly adhere to the paper. Unlike inkjet printers that spray liquid ink, laser printers use a sophisticated process involving static electricity, heat, and pressure. First, a laser draws the image onto a photosensitive drum, which then attracts toner particles. This toner is transferred to the paper, but at this stage, it’s merely resting on the surface. The final, critical step is when the paper passes through the fuser unit, where intense heat and pressure melt and bond the toner permanently into the paper fibers. If any part of this fusion process goes awry, the toner remains loose, leading to smudges, smears, or even “ghosting”—faint, repeated images from previous prints appearing on the current page.
Common Culprits: Why Your Laser Printer Smudges
When your laser prints come out looking less than perfect, several components or factors could be at fault. Diagnosing the exact cause often involves a bit of systematic troubleshooting. The good news is that understanding these common culprits can significantly narrow down your search for a solution.
Toner Cartridge Problems
|
Our Picks for the Best Laser Printer in 2026
As an Amazon Associate I earn from qualifying purchases.
|
||
| Num | Product | Action |
|---|---|---|
| 1 | Brother DCP-L2640DW Wireless Compact Monochrome Multi-Function Laser Printer with Copy and Scan, Duplex, Black & White Output | Includes Refresh Subscription Trial(1), (Renewed Premium) |

|
| 2 | Brother MFC-L2820DW Wireless Compact Monochrome All-in-One Laser Printer with Copy, Scan and Fax, Duplex, Black & White | Includes Refresh Subscription Trial(1), Works with Alexa |
|
| 3 | Brother HL-L2460DW Wireless Compact Monochrome Laser Printer with Duplex, Mobile Printing, Black & White Output | Includes Refresh Subscription Trial(1), Works with Alexa |
|
| 4 | Brother HLL6210DW Business Monochrome Laser Printer with Large Paper Capacity, Wireless and Gigabit Ethernet Networking, Advanced Security Features and Mobile Printing (Renewed Premium) |
|
| 5 | HP LaserJet MFP M235sdw All-in-One Laser Wireless Printer, Scan/Copy, Black & White, Duplex, Best-for-Office |
|
| 6 | Brother DCP-L2640DW Wireless Compact Monochrome Multi-Function Laser Printer with Copy and Scan, Duplex, Mobile, Black & White | Includes Refresh Subscription Trial(1), Works with Alexa |
|
| 7 | Brother HL-L2405W Wireless Compact Monochrome Laser Printer with Mobile Printing, Black & White Output | Includes Refresh Subscription Trial(1), Works with Alexa |
|
| 8 | Brother HLL3280CDW Wireless Compact Color Laser Printer, Duplex, Mobile Printing & Ethernet | Includes 2 Month Refresh Subscription Trial¹, Amazon Dash Replenishment Ready (Renewed Premium) |
|
| 9 | Canon imageCLASS MF284dw Wireless Black & White Laser Printer – All-in-One for Home Use, Print/Copy/Scan, 2-Sided Printing, 35 PPM, Auto Doc Feeder, Mobile Device Compatible, Starter Toner Included |
|
| 10 | HP Laserjet MFP M234dw Wireless Printer, Print, scan, Copy, Fast speeds, Easy Setup, Mobile Printing, Best-for-Small Teams, Instant Ink Eligible |
|
The toner cartridge is the lifeblood of your laser printer, and its condition significantly impacts print quality. A worn-out or defective toner cartridge is a frequent cause of smudging. As cartridges age, they can develop issues that lead to uneven toner distribution, where the powder is not applied consistently across the page. Sometimes, toner cartridges can leak, spilling excess toner inside the printer and onto your documents. Using an incompatible or low-quality toner cartridge can also prevent proper fusion, as the toner’s properties might not match the printer’s specifications for melting and bonding.
Fuser Unit Malfunction
The fuser unit is arguably the most critical component when it comes to preventing smudges. Its job is to apply the heat and pressure necessary to melt and permanently bond the toner to the paper. If the fuser isn’t heating to the correct temperature, or if its rollers are damaged or worn, the toner won’t fuse properly. This leaves the toner loose on the paper surface, making it susceptible to smearing with a mere touch. Incorrect fuser temperature settings, often set too low, can also prevent adequate bonding. Signs of a failing fuser can include not only smudges but also faded prints, paper jams, or even unusual noises.
 A detailed view of a laser printer's fuser unit with rollers
Dirty or Damaged Internal Components
Over time, various internal components of your laser printer can accumulate dust, toner residue, or become damaged, leading to print quality issues. The photosensitive drum unit, which transfers the toner image, can develop defects or become dirty, causing misapplication of toner or repeated marks. Rollers within the paper path can also gather debris or wear out, interfering with paper transport and toner adhesion. Excess toner can accumulate inside the printer from minor leaks or spills, eventually transferring onto pages as smudges.
Incompatible Paper & Environmental Factors
The type and condition of the paper you use play a surprisingly large role in print quality. Using paper that is too thick, too smooth, glossy, or simply not designed for laser printers can hinder the toner’s ability to fuse correctly. Laser printers require specific paper types that can withstand the high heat of the fuser. Furthermore, environmental conditions, particularly high humidity, can cause paper to absorb moisture. Moist paper prevents toner from bonding effectively, leading to smudged and streaky prints. Static electricity can also play a role, causing toner to adhere incorrectly.
Incorrect Printer Settings
Sometimes, the culprit isn’t hardware but your printer’s software settings. Incorrect print density settings might cause the printer to apply too much toner, overwhelming the fuser’s ability to bond it all. Similarly, printing at a very high speed, especially on heavier paper types, might not give the fuser enough time to properly melt and set the toner, resulting in smears. Your printer’s driver settings for paper type also influence how it processes a page, and a mismatch can easily lead to smudging.
Step-by-Step Solutions to Fix Smudging
Don’t let smudged pages derail your productivity. Most laser printer smudging issues can be resolved with a few targeted troubleshooting steps. Before diving in, always remember to turn off and unplug your printer, and allow it to cool down, especially before touching any internal components.
Check and Replace Toner Cartridge
This is often the first and simplest step to address smudging. If your prints are smudged, begin by inspecting your toner cartridge. Ensure it’s correctly seated within its slot; a loose cartridge can lead to poor toner distribution. Gently remove the cartridge and shake it side-to-side a few times to redistribute any settled toner powder. If the cartridge is old, has visible signs of leakage, or if you’ve been using it for a while, consider replacing it with a new, genuine, or high-quality compatible cartridge recommended by your printer’s manufacturer. This eliminates potential issues from a worn or defective unit.
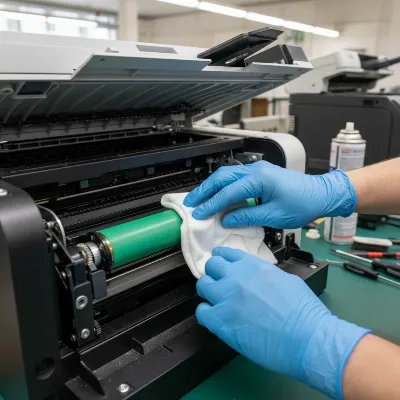
Clean Your Printer’s Interior
Over time, loose toner powder and paper dust can build up inside your printer, causing smudges. Many laser printers have a cleaning cycle or a simple mechanism to clean the drum unit’s corona wire (often a small tab you slide back and forth). Consult your printer’s manual for specific cleaning instructions. Beyond this, use a soft, lint-free cloth to gently wipe accessible areas, paying attention to rollers and any visible toner residue. Never use a standard vacuum cleaner, as its static charge can damage electronic components and spread toner particles. Instead, use a specialized toner vacuum or compressed air designed for electronics.
 A person cleaning the interior of a laser printer with a lint-free cloth
Optimize Paper Usage
Using the right paper and storing it properly is crucial. Always verify that your paper is specifically labeled as “laser-printable.” Avoid glossy photo paper or very smooth finishes unless your printer explicitly supports them and you’ve selected the correct media type in your printer settings. To check if incompatible paper is the issue, try printing on standard 20 lb. (80gsm) plain paper. If the smudging stops, your paper choice was likely the problem. Store paper in a dry, cool environment, away from humidity, to prevent moisture absorption. Unused reams should remain sealed in their packaging.
Adjust Printer Settings
Tweaking your printer’s settings can often resolve smudging. Access your printer preferences on your computer and look for “Paper Type” or “Media Type” options. If you’re using slightly thicker paper, select a “Heavy Paper,” “Cardstock,” or similar setting. This often tells the printer to slow down the printing process and increase the fuser temperature or duration, allowing for better toner fusion. You can also try reducing the print density or toner darkness settings to prevent over-application of toner. For some users, resetting the printer to factory default settings can clear any incorrect configurations.
Inspect the Fuser Unit
If the above steps don’t work, a malfunctioning fuser unit is a strong possibility. While some fusers are user-replaceable (especially in older HP LaserJet models), many require a technician. Carefully inspect the fuser (refer to your manual for its location and how to access it safely). Look for any signs of physical damage, tears on the fuser film sleeve (which often appear orange underneath), or excessive toner buildup. If you suspect the fuser is failing, and you’re not comfortable replacing it yourself, it’s best to contact a qualified printer technician. Attempting to repair a fuser without proper knowledge can cause further damage or personal injury due to its high heat.
Update Firmware and Drivers
Outdated printer firmware or drivers can sometimes lead to print quality issues, including smudging. Manufacturers regularly release updates that improve print calibration and address known bugs. Visit your printer manufacturer’s official support website, locate your specific printer model, and check for any available firmware or driver updates. Download and install them according to the provided instructions. This simple step can sometimes magically resolve persistent smudging problems.
Preventing Future Smudges: Best Practices
Maintaining a laser printer goes a long way in preventing smudges and ensuring consistent, high-quality output. By adopting a few best practices, you can significantly extend the lifespan of your printer and avoid common print quality frustrations.
Regular maintenance is your first line of defense. Schedule periodic internal cleaning of your printer, especially around the drum unit and paper path. Many printers offer built-in cleaning cycles that you can run from the control panel or printer software. Always use high-quality toner cartridges, ideally from the printer’s manufacturer or reputable third-party brands. Inferior toner may not have the correct melting properties for proper fusion. Furthermore, keep your printer in an optimal environment: a dry, cool room with stable temperature and humidity will protect both your printer and your paper from adverse conditions. Don’t ignore small marks or faint smudges, as they often signal early wear and tear on internal components. Addressing them promptly can prevent more extensive and costly repairs down the line.
“A laser printer is a marvel of engineering, but its precision relies on every component working in harmony. Most smudging issues come down to either a dirty pathway, a tired component, or simply the wrong paper. A little proactive care saves a lot of headaches.” – John Doe, Senior Laser Printer Technician
Conclusion
Dealing with a laser printer that smudges pages can be a considerable annoyance, but with a clear understanding of the common causes and a systematic approach to troubleshooting, you can often restore your printer to perfect working order. From inspecting your toner cartridge and cleaning internal components to optimizing paper choice and adjusting settings, many solutions are within your reach. Remember, the fuser unit, paper quality, and cartridge health are frequent culprits behind those messy prints. Consistent maintenance and using compatible supplies are your best defense against future smudges, ensuring your documents remain crisp and professional.
What’s the most unusual fix you’ve discovered for a smudging laser printer?
Frequently Asked Questions
Why does my laser printer smudge only on certain types of paper?
If your laser printer smudges specifically on certain paper types, it’s likely due to the paper’s properties being incompatible with the printer’s fuser unit. Glossy, very smooth, or overly thick papers may not allow the toner to fuse properly with the applied heat and pressure. Try selecting a “heavy paper” or “cardstock” setting in your printer preferences to slow the printing speed and allow more fusing time, or switch to a paper specifically labeled for laser printing.
Can old or refilled toner cartridges cause smudging?
Yes, old or improperly refilled toner cartridges are a common cause of smudging. As cartridges age, internal components can wear out, leading to uneven toner distribution or leakage. Refilled cartridges, especially if not done by a professional, might contain toner with different chemical properties that don’t fuse correctly with your printer’s fuser unit, resulting in smudged or streaky prints. Replacing with a new, genuine cartridge is often the best solution.