To safely clean a laser printer drum unit at home, first unplug the printer and allow it to cool for 15-20 minutes. Then, wearing gloves and a mask, carefully remove the drum unit according to your printer’s manual. Gently wipe the drum surface with a dry, lint-free cloth, and for stubborn marks, use a cloth or cotton swab lightly dampened with 90% or higher isopropyl alcohol. Avoid touching the photosensitive surface directly and reassemble once dry to restore print quality.
What is a Laser Printer Drum Unit?
At its core, a laser printer drum unit, often a green or blue cylindrical component, is responsible for the electrostatic process that transfers toner powder onto your paper. Unlike an inkjet printer that sprays liquid ink, a laser printer uses a laser to project an image onto this photosensitive drum. This creates an electrostatic charge that attracts toner particles, which are then fused onto the paper using heat and pressure. The drum unit works in close conjunction with the toner cartridge, but it does not contain the toner itself; rather, it’s the medium that applies the toner to create the image or text.
When to Clean Your Drum Unit
Recognizing the signs of a dirty drum unit can save you from unnecessary replacements and improve your print quality dramatically. Typically, if your prints start exhibiting quality issues that aren’t resolved by changing the toner cartridge, the drum unit is a prime suspect. For browse all laser printer articles on this site.
Signs Your Drum Unit Needs Cleaning:
- Faded or Blurry Prints: If your documents appear washed out or lack sharpness, even with a full toner cartridge, the drum may not be transferring toner effectively.
- Streaks or Lines: Persistent vertical or horizontal lines on your pages often indicate accumulated toner residue, dust, or even a minor scratch on the drum’s surface.
- Black Spots or Smudges: Irregular black dots or blotches that appear in the same repeating pattern on every page are a common sign of a defect or dirt patch on the drum.
- Ghosting: When a faint image from a previous page appears on a new printout, it suggests the drum isn’t properly clearing old toner.
- Paper Jams: While less common, excessive toner buildup on the drum can sometimes interfere with paper movement, leading to jams.
- Unusual Noises: Although rare, grinding or clicking sounds could point to issues with the drum’s gears or other internal components that might be exacerbated by dirt.
These visual cues are your printer’s way of telling you it needs a little attention. Addressing these signs promptly can prevent further damage and maintain your printer’s optimal performance.
Essential Tools for Cleaning a Drum Unit
Before you begin, gathering the right tools is crucial. Using inappropriate materials can cause irreversible damage to your delicate drum unit.
Soft, Lint-Free Cloths
|
Our Picks for the Best Laser Printer in 2026
As an Amazon Associate I earn from qualifying purchases.
|
||
| Num | Product | Action |
|---|---|---|
| 1 | Brother DCP-L2640DW Wireless Compact Monochrome Multi-Function Laser Printer with Copy and Scan, Duplex, Mobile, Black & White | Includes Refresh Subscription Trial(1), Works with Alexa |

|
| 2 | Brother DCP-L2640DW Wireless Compact Monochrome Multi-Function Laser Printer with Copy and Scan, Duplex, Black & White Output | Includes Refresh Subscription Trial(1), (Renewed Premium) |
|
| 3 | HP Laserjet MFP M234dw Wireless Printer, Print, scan, Copy, Fast speeds, Easy Setup, Mobile Printing, Best-for-Small Teams, Instant Ink Eligible |
|
| 4 | Brother MFC-L2820DW Wireless Compact Monochrome All-in-One Laser Printer with Copy, Scan and Fax, Duplex, Black & White | Includes Refresh Subscription Trial(1), Works with Alexa |
|
| 5 | Canon imageCLASS MF284dw Wireless Black & White Laser Printer – All-in-One for Home Use, Print/Copy/Scan, 2-Sided Printing, 35 PPM, Auto Doc Feeder, Mobile Device Compatible, Starter Toner Included |
|
| 6 | Brother HL-L2460DW Wireless Compact Monochrome Laser Printer with Duplex, Mobile Printing, Black & White Output | Includes Refresh Subscription Trial(1), Works with Alexa |
|
| 7 | HP LaserJet MFP M235sdw All-in-One Laser Wireless Printer, Scan/Copy, Black & White, Duplex, Best-for-Office |
|
| 8 | Brother HL-L2405W Wireless Compact Monochrome Laser Printer with Mobile Printing, Black & White Output | Includes Refresh Subscription Trial(1), Works with Alexa |
|
| 9 | Brother HLL6210DW Business Monochrome Laser Printer with Large Paper Capacity, Wireless and Gigabit Ethernet Networking, Advanced Security Features and Mobile Printing (Renewed Premium) |
|
| 10 | Brother HLL3280CDW Wireless Compact Color Laser Printer, Duplex, Mobile Printing & Ethernet | Includes 2 Month Refresh Subscription Trial¹, Amazon Dash Replenishment Ready (Renewed Premium) |
|
These are indispensable for gently wiping the drum surface without leaving behind fibers that could cause new print defects. Microfiber cloths are an excellent choice.
Isopropyl Alcohol (IPA)
Opt for 90% concentration or higher for effective cleaning. Isopropyl alcohol evaporates quickly, leaving no residue, which is vital for sensitive printer components. Avoid regular rubbing alcohol, which often contains added ingredients that can leave streaks or damage the drum’s photosensitive coating.
Cotton Swabs or Cotton Balls
These are perfect for applying isopropyl alcohol to stubborn spots or for cleaning intricate areas.
Rubber Gloves
Wearing gloves is essential to protect your hands from toner particles, which can be messy and potentially irritating. More importantly, it prevents the natural oils from your skin from transferring to the drum surface, as these oils can leave marks and degrade print quality.
Face Mask
Toner particles are extremely fine and can become airborne easily. A face mask offers protection against inhaling these particles, which can be harmful.
Soft-Bristled Brush
A small, soft-bristled brush, such as a clean, unused paintbrush, can help dislodge loose toner dust from crevices and the printer’s interior without scratching surfaces.
Old Newspapers or Paper Towels
Lay these down on your workspace to catch any spilled toner and protect your surfaces. Toner is notoriously difficult to clean once it settles on fabrics or furniture.
Manufacturer’s Manual
Always keep your printer’s manual handy. It provides model-specific instructions for safely accessing and removing components, which can vary significantly between brands and models.
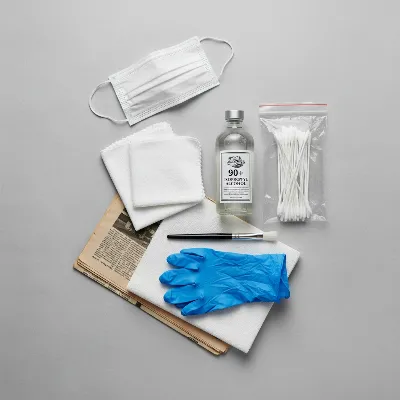 Essential tools for safely cleaning a laser printer drum unit at home
Step-by-Step Guide to Safely Clean Your Laser Printer Drum Unit
Cleaning a laser printer drum unit requires a delicate touch and adherence to safety protocols. Follow these steps carefully to avoid damaging your printer.
Preparation: Safety First
Begin by ensuring your safety and protecting your printer. Turn off your printer and unplug it from the power source. This crucial step prevents electrical shock and accidental damage. If the printer has been recently in use, allow it to cool down for at least 15-20 minutes, as internal components, especially the fuser, can become very hot. Lay down old newspapers or paper towels on a clean, flat surface to protect it from toner spills. Finally, don your rubber gloves and face mask to protect yourself from toner particles and skin oils.
Removing the Drum Unit
The process for accessing the drum unit can vary. Open your printer’s access panel—this is typically where the toner and drum unit are housed. Consult your printer’s manufacturer’s manual for precise instructions on how to carefully remove the toner cartridge, and then the drum unit. In many cases, the toner cartridge is housed within the drum unit and can be separated by pressing a release lever. Handle the drum unit by its plastic housing, avoiding direct contact with the photosensitive cylindrical surface.
Inspecting the Drum Unit for Damage
Once removed, gently place the drum unit on your protected workspace. Inspect the drum’s surface for any visible toner buildup, dust, smudges, or scratches. If you have a recent printout showing defects, compare it to the drum to identify corresponding marks. This inspection helps pinpoint the exact areas that need attention. The drum is extremely sensitive to light; avoid prolonged exposure to direct sunlight or bright artificial light.
Gentle Cleaning of the Drum Surface
Start by gently wiping the surface of the drum with a dry, soft, lint-free cloth. Use light pressure and wipe in one direction. This can often remove loose toner particles. For more stubborn stains or marks, lightly dampen a fresh, lint-free cloth or a cotton swab with 90% or higher isopropyl alcohol. Gently wipe the affected areas, allowing the alcohol to dissolve the toner for a few seconds before wiping it away. Avoid scrubbing vigorously, as this can scratch or damage the delicate photosensitive coating.
If your drum unit has gears, you might need to rotate the drum to clean its entire surface. Always rotate the drum in the direction of printing (often indicated by an arrow or the direction of paper feed). Rotating it backward could damage internal gears or the cleaning blade.
Cleaning the Corona Wire (If Applicable)
Some older or specific laser printer models may have an exposed corona wire, which is a thin wire running parallel to the drum unit. This wire helps in the electrostatic charging process and can also accumulate toner. If your printer has one and it’s accessible, gently clean it using a dry cotton swab or the specific cleaning tool provided by your manufacturer. Be extremely gentle, as this wire is very fragile. Many modern printers have integrated or protected corona wires that do not require user cleaning.
Reassembling and Testing
Once you are satisfied with the cleaning, use a clean, dry lint-free cloth to gently wipe off any residual moisture or alcohol from the drum surface. Allow a few minutes for any remaining alcohol to fully evaporate. Carefully reinsert the drum unit into your printer, ensuring it locks securely into place, and then reinsert the toner cartridge. Close the printer cover and plug the printer back in. Turn it on and perform a test print to verify that the print quality has improved and that the cleaning was successful.
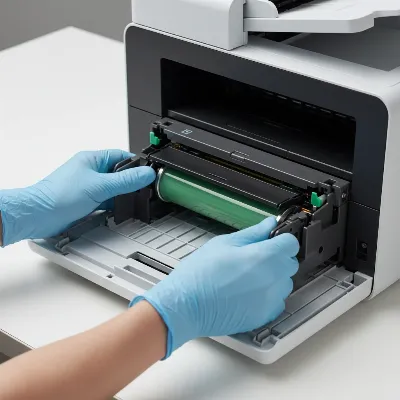 Step-by-step guide to safely cleaning a laser printer drum unit at home
Common Mistakes to Avoid When Cleaning Your Drum Unit
The laser printer drum unit is a highly sensitive component. Avoiding common pitfalls is as important as following the correct cleaning steps.
Using Abrasive Materials
Never use rough cloths, paper towels with textures, or any abrasive cleaners. These can scratch the delicate photosensitive surface of the drum, causing permanent damage and print defects that cleaning cannot fix. Stick to soft, lint-free microfiber cloths.
Touching the Drum Surface Directly
The oils and dirt from your bare hands can leave fingerprints on the drum, which will translate into unsightly marks on your printed pages. Always wear rubber or latex gloves when handling the drum unit.
Using Harsh Chemicals
Avoid household cleaners, window cleaner, or any alcohol not specifically identified as high-concentration isopropyl alcohol. Many common cleaning agents contain additives or leave residues that can damage the drum’s coating or cause streaking and print quality issues. “Regular pink alcohol” should also be avoided as it can contain substances that leave halos or print defects.
Forcing Components
Printer parts are designed to fit precisely. If you encounter resistance when removing or reinstalling the drum unit or toner cartridge, do not force it. Refer to your printer’s manual to ensure you are following the correct procedure. Forcing components can break fragile plastic clips or damage internal mechanisms.
Over-Exposure to Light
The drum unit is photosensitive, meaning prolonged exposure to bright light can degrade its performance. Always keep the drum unit in subdued lighting and return it to the printer as soon as cleaning is complete.
Maintaining Your Drum Unit for Longevity
Regular cleaning is just one part of ensuring your drum unit—and indeed your entire printer—lasts longer and performs optimally. Proactive maintenance can significantly extend its life.
Using Quality Toner Cartridges
The quality of your toner directly impacts the cleanliness and longevity of your drum unit. Inferior or refilled toner cartridges can often contain particles that are too large or of inconsistent quality, leading to excessive buildup and premature wear on the drum. Investing in genuine or high-quality compatible toner is a wise decision.
Proper Printer Placement
Where you place your printer matters. Avoid locations prone to excessive dust, humidity, or extreme temperature fluctuations. Dust can infiltrate the printer and accumulate on internal components, including the drum, while humidity can affect toner properties and paper feeding. A stable, clean, and dry environment is ideal.
Regular General Printer Maintenance
Beyond the drum, other printer components also benefit from occasional cleaning. Use compressed air (held upright and at a safe distance) to remove dust from internal cavities, and gently wipe rollers with a lint-free cloth. Regularly running specialized printer cleaning sheets through your machine can also help remove toner residue and paper particles from rollers and around the drum, contributing to sharper prints and extending the printer’s lifespan.
“A well-maintained laser printer, especially its drum unit, is the secret to consistent print quality and avoiding costly repairs. Think of it as preventative care for your digital documents.” – John Smith, Senior Laser Printer Technician
Top Laser Printer Models for Home and Small Office Use
While specific model recommendations can change rapidly, several brands consistently offer reliable laser printers suitable for home and small office environments. When choosing, consider factors like print speed, resolution, connectivity options, and duplex printing capabilities.
For monochrome (black and white) printing, popular choices often include models from:
- Brother: Known for their robust and cost-effective printers, many Brother models offer separate toner and drum units, which can lead to lower running costs.
- HP LaserJet: Offering a wide range from compact personal printers to more powerful office machines, HP models are reliable workhorses for text documents.
- Canon imageCLASS: Canon provides efficient monochrome laser printers with good print quality and user-friendly features.
For color laser printing, options expand to include:
- Brother MFC/HL Series: Providing good value for money with acceptable color quality for documents and presentations.
- HP Color LaserJet: A strong contender for those needing vibrant color prints with professional quality.
- Lexmark: Known for their enterprise solutions, Lexmark also offers solid color laser printers for smaller environments, often with good security features.
When selecting a model, always check recent reviews, compare running costs (especially toner and drum replacement costs), and ensure it fits your specific printing needs.
Conclusion
A clean laser printer drum unit is fundamental to achieving high-quality prints and prolonging the life of your printer. By understanding its function, recognizing the signs of a dirty drum, and following careful cleaning procedures with the right tools, you can confidently tackle this maintenance task at home. Remember the importance of safety—unplugging your printer and wearing gloves—and always use appropriate cleaning materials like high-concentration isopropyl alcohol and lint-free cloths. Regular attention to your drum unit not only resolves frustrating print issues but also contributes to the overall health and efficiency of your printing ecosystem.
What print quality issue has prompted you to consider cleaning your laser printer’s drum unit?
Frequently Asked Questions
Can a dirty drum unit cause permanent damage to my laser printer?
While a dirty drum unit primarily causes print quality issues, persistent neglect can lead to toner buildup in other parts of the printer, potentially causing paper jams or wear on other components over time. However, direct permanent damage from a dirty drum unit itself is less common than print quality degradation.
How often should I clean my laser printer drum unit?
The cleaning frequency depends on your printer’s usage and environment. If you print heavily or in a dusty area, you might need to clean it every few months. For light use, an annual check-up might suffice. The best indicator is when you start noticing print quality issues like streaks or smudges.
What is the difference between a toner cartridge and a drum unit?
The toner cartridge holds the toner powder, which is the “ink” of a laser printer. The drum unit, or imaging unit, is a separate component (though sometimes combined with the toner cartridge) that uses an electrostatic charge to transfer the toner from the cartridge onto the paper to form the image.
Is it always possible to clean a drum unit, or does it sometimes need replacement?
While cleaning can resolve many print quality issues caused by dirt or toner buildup, a drum unit can also wear out over time. Signs like deep scratches, “Drum Near End of Life” error messages, or persistent print defects even after thorough cleaning indicate that the drum unit has reached the end of its lifespan and needs to be replaced.
Can I use water to clean my laser printer drum?
No, you should never use plain water to clean a laser printer drum. Water can leave residues, conduct electricity, and potentially damage the sensitive photosensitive coating of the drum. Always use high-concentration isopropyl alcohol (90% or higher) which evaporates quickly and cleanly.
Safely Clean Your Laser Printer Drum Unit
Follow these steps to safely clean your laser printer drum unit at home and restore optimal print quality, avoiding common mistakes that can damage the delicate component.
Turn off and unplug your printer, allowing it to cool for 15-20 minutes. Lay down old newspapers or paper towels on a clean, flat surface to protect from toner spills. Don rubber gloves and a face mask to protect yourself from toner particles and skin oils.
Consult your printer's manual for precise instructions on how to carefully remove the toner cartridge and then the drum unit. Handle the drum unit by its plastic housing, avoiding direct contact with the photosensitive surface. Inspect the drum for visible toner buildup, dust, smudges, or scratches, comparing it to a recent defective printout if available.
Gently wipe the drum surface with a dry, soft, lint-free cloth using light pressure and wiping in one direction. For stubborn marks, lightly dampen a fresh, lint-free cloth or cotton swab with 90% or higher isopropyl alcohol. Gently wipe affected areas, allowing alcohol to dissolve toner for a few seconds before wiping away. Avoid vigorous scrubbing.
If your printer model has an exposed corona wire, gently clean it using a dry cotton swab or the manufacturer's specific cleaning tool. Be extremely gentle as this wire is very fragile. Many modern printers have integrated or protected corona wires that do not require user cleaning.
Use a clean, dry lint-free cloth to wipe off any residual moisture or alcohol from the drum surface, allowing a few minutes for full evaporation. Carefully reinsert the drum unit and toner cartridge, ensuring they lock securely. Close the printer cover, plug in the printer, turn it on, and perform a test print to verify improved print quality.
Get our weekly buyer guide
Practical specs, not advice. Unsubscribe anytime.
Good tips for maintaining print quality. I’ve always been a bit nervous about touching the photosensitive surface, but the reminder to wear gloves and be gentle was key. My Brother printer’s drum unit was a bit tricky to get out, but once I did, a quick wipe improved things. I wish there was a bit more detail on how often this cleaning should be done for regular office use.
I was getting really frustrated with streaky prints from my HP LaserJet, and I suspected it was the drum unit. Following the advice here about using a lint-free cloth and isopropyl alcohol made a huge difference. My prints are crisp again, and it saved me from having to buy a new drum right away. Definitely a helpful guide for anyone with print quality issues.
The instructions for cleaning the drum unit were clear, especially the part about unplugging and letting it cool. I tried using a cotton swab with isopropyl alcohol on some stubborn marks on my Canon imageCLASS drum, and while it helped a little, some faint lines are still there. It’s better than before, but not perfectly resolved. Maybe my drum is just too old.
This was exactly what I needed! My prints were looking faded and I thought my toner was low, but it turned out to be the drum unit. The explanation of how the laser projects an image onto the drum really helped me understand why cleaning it is so important. My home office printer is back to printing perfectly after following these steps.